Spring IOC創建對象的兩種方式
IOC創建對象的方式
一、 使用無參構造創建對象(默認方式)創建實體類
注意:屬性必須要有set方法,來完成注入
public class User { private String name; public User() { System.out.println('執行了User類的無參構造方法~'); } public User(String name){ this.name = name; System.out.println('執行了User類的有參構造方法'); } //使用無參構造方法時,必須要設置set方法,因為注入時 需要通過set方法注入 public void setName(String name) { this.name = name; } @Override public String toString() { return 'User{' +'name=’' + name + ’’’ +’}’; }}
配置Bean
<?xml version='1.0' encoding='UTF-8'?><beans xmlns='http://www.springframework.org/schema/beans' xmlns:xsi='http://www.w3.org/2001/XMLSchema-instance' xsi:schemaLocation='http://www.springframework.org/schema/beans https://www.springframework.org/schema/beans/spring-beans.xsd'> <bean class='com.test.pojo.User'> <property name='name' value='gyp'/> </bean></beans>
測試類
public class MyTest { public static void main(String[] args) { ApplicationContext context = new ClassPathXmlApplicationContext('applicationContext.xml'); User user = context.getBean('user', User.class); System.out.println(user); }}
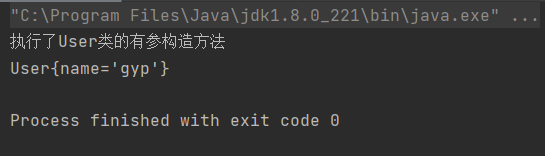
結果:
有參構造,不需要set方法注入
通過下標方式注入(通過index來選擇,給有參構造的第幾個參數注入)
(1)配置Bean
<bean class='com.test.pojo.User'> <constructor-arg index='0' value='gyp'/> </bean>
(2)測試結果
通過名字注入
(1)配置Bean
<bean class='com.test.pojo.User'> <constructor-arg name='name' value='gyp'/> </bean>
(2)測試結果
通過類型注入(不建議使用!因為當類里面有兩個相同類型的屬性時,無法給屬性注入)
(1)配置Bean
<bean class='com.test.pojo.User'> <constructor-arg type='java.lang.String' value='gyp'/> </bean>
(2)測試結果

總結:在加載配置文件的時候,IOC就已經創建好了對象!
到此這篇關于Spring IOC創建對象的兩種方式的文章就介紹到這了,更多相關Spring IOC創建對象內容請搜索好吧啦網以前的文章或繼續瀏覽下面的相關文章希望大家以后多多支持好吧啦網!
相關文章:

 網公網安備
網公網安備