SpringBoot @Validated注解實現參數分組校驗的方法實例
前言
在前后端分離開發的時候我們需要用到參數校驗,前端需要進行參數校驗,后端接口同樣的也需要,以防傳入不合法的數據。
1、首先還是先導包,導入pom文件。
<dependency> <groupId>org.springframework.boot</groupId> <artifactId>spring-boot-starter-validation</artifactId></dependency>
2、解釋一下注解的作用
@Null 限制只能為null@NotNull 限制必須不為null@NotEmpty 只作用于字符串類型,字符串不為空,并且長度不為0@NotBlank 只作用于字符串類型,字符串不為空,并且trim()后不為空串@AssertFalse 限制必須為false@AssertTrue 限制必須為true@DecimalMax(value) 限制必須為一個不大于指定值的數字@DecimalMin(value) 限制必須為一個不小于指定值的數字@Digits(integer,fraction) 限制必須為一個小數,且整數部分的位數不能超過integer,小數部分的位數不能超過fraction@Future 限制必須是一個將來的日期@Past 驗證注解的元素值(日期類型)比當前時間早@Max(value) 限制必須為一個不大于指定值的數字@Min(value) 限制必須為一個不小于指定值的數字@Pattern(value) 限制必須符合指定的正則表達式@Size(max,min) 限制字符長度必須在min到max之間@Email 驗證注解的元素值是Email,也可以通過正則表達式和flag指定自定義的email格式
3、在實體類加上要驗證的字段。(我這里隨便寫下)
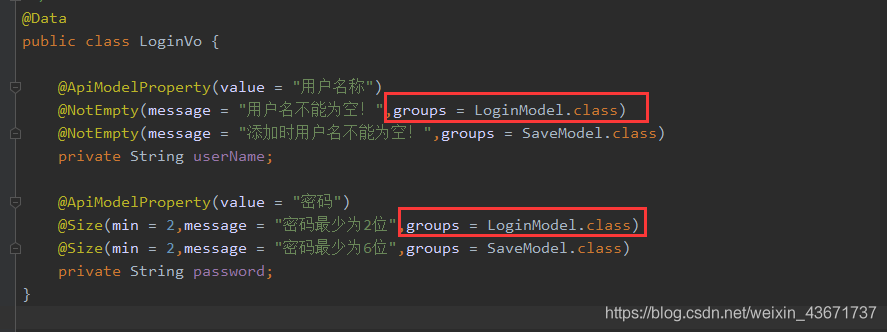
標注的地方就是用來分組校驗的,下下面會解釋。
@Datapublic class LoginVo { @ApiModelProperty(value = '用戶名稱') @NotEmpty(message = '用戶名不能為空!',groups = LoginModel.class) @NotEmpty(message = '添加時用戶名不能為空!',groups = SaveModel.class) private String userName; @ApiModelProperty(value = '密碼') @Size(min = 2,message = '密碼最少為2位',groups = LoginModel.class) @Size(min = 6,message = '密碼最少為6位',groups = SaveModel.class) private String password;}
通過groups的屬性來分組,假設我在使用登錄分組校驗的時候,設定用戶名不能為空和密碼最少為2位的驗證。而在添加分組設定添加時用戶名不能為空和密碼最少為6位的驗證。
4、在來解釋下上面標注的分組接口。
LoginModel
import javax.validation.groups.Default;public interface LoginModel extends Default {}
必須繼承默認的Defaut接口不然后拋出異常。
SaveModel
import javax.validation.groups.Default;public interface SaveModel extends Default{}
5、在controller的接口上加上@Validated注解,參數就加上你需要根據那種規則來校驗。
@ApiOperation(value = '登錄以后返回token') @PostMapping(value = '/login') public Result login(@RequestBody @Validated(LoginModel.class) LoginVo loginVo) { String token = userService.login(loginVo.getUserName(), loginVo.getPassword()); return Result.success(token); }
運行后只能在控制臺顯示錯誤的結果,新的問題又來了怎么把錯誤的結果通過自己的result類返回給前端。這就需要對錯誤全局捕捉了。
6、寫一個對Response換回結果的處理。
@RestControllerAdvice@Slf4jpublic class ParameterCalibration { @ExceptionHandler({MethodArgumentNotValidException.class, BindException.class}) @ResponseStatus(HttpStatus.OK) @ResponseBody public Result handleMethodArgumentNotValidException(Exception exception) { StringBuilder errorInfo = new StringBuilder(); BindingResult bindingResult=null; if(exception instanceof MethodArgumentNotValidException){ bindingResult= ((MethodArgumentNotValidException)exception).getBindingResult(); } if(exception instanceof BindException){ bindingResult= ((BindException)exception).getBindingResult(); } for(int i = 0; i < bindingResult.getFieldErrors().size(); i++){ if(i > 0){errorInfo.append(','); } FieldError fieldError = bindingResult.getFieldErrors().get(i); errorInfo.append(fieldError.getField()).append(' :').append(fieldError.getDefaultMessage()); } log.error(errorInfo.toString()); //這里返回自己的Result的結果類。 return Result.validateFailed(errorInfo.toString()); } @ExceptionHandler(Exception.class) @ResponseStatus(HttpStatus.BAD_REQUEST) @ResponseBody public Result handleDefaultException(Exception exception) { log.error(exception.toString()); //這里返回自己的Result的結果類。 return Result.validateFailed('服務器錯誤',exception); }}
``
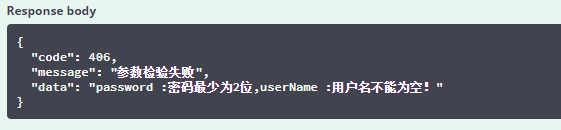
7. 先測試LoginModel的校驗規則
控制臺打印的數據

前端收到的數據
切換成SaveModel控制臺打印的數據

切換成SaveModel前端收到的數據

可以看到兩次的驗證規則時不同的,完成了簡易的分組操作。
8 、總結,就是在添加驗證規則的時候指定對應的分組,在使用時傳入需要的分組。可能理解有誤,發現請指導。
總結
到此這篇關于SpringBoot @Validated注解實現參數分組校驗的文章就介紹到這了,更多相關SpringBoot @Validated注解實現參數分組校驗內容請搜索好吧啦網以前的文章或繼續瀏覽下面的相關文章希望大家以后多多支持好吧啦網!
相關文章:
 網公網安備
網公網安備