SpringBoot整合RabbitMQ的5種模式實戰
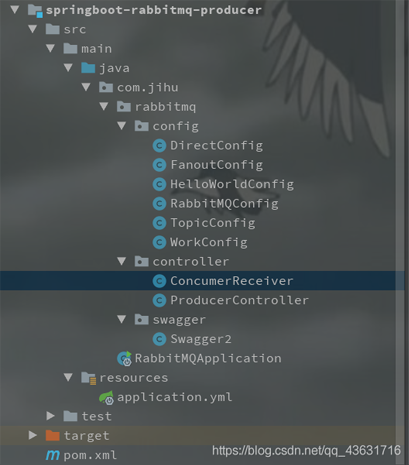
1、pom依賴
<!-- 父工程依賴 --> <parent><groupId>org.springframework.boot</groupId><artifactId>spring-boot-starter-parent</artifactId><version>2.3.6.RELEASE</version> </parent> <dependencies><dependency> <groupId>org.springframework.boot</groupId> <artifactId>spring-boot-starter-web</artifactId></dependency><dependency> <groupId>org.springframework.boot</groupId> <artifactId>spring-boot-starter-amqp</artifactId></dependency><dependency> <groupId>org.springframework.boot</groupId> <artifactId>spring-boot-starter-test</artifactId></dependency><dependency> <groupId>io.springfox</groupId> <artifactId>springfox-swagger2</artifactId> <version>2.6.0</version></dependency><dependency> <groupId>io.springfox</groupId> <artifactId>springfox-swagger-ui</artifactId> <version>2.6.0</version></dependency> </dependencies>
2、配置文件
server: port: 8080spring: rabbitmq: host: 192.168.131.171 port: 5672 username: jihu password: jihu virtual-host: /jihu
3、啟動類
@SpringBootApplicationpublic class RabbitMQApplication { public static void main(String[] args) { SpringApplication.run(RabbitMQApplication.class); }}
5、Swagger2類
@Configuration@EnableSwagger2public class Swagger2 { // http://127.0.0.1:8080/swagger-ui.html @Bean public Docket createRestApi() {return new Docket(DocumentationType.SWAGGER_2).apiInfo(apiInfo()).select().apis(RequestHandlerSelectors.basePackage('com.jihu')).paths(PathSelectors.any()).build(); } private ApiInfo apiInfo() {return new ApiInfoBuilder().title('極狐-Spring Boot中使用spring-boot-starter-amqp集成rabbitmq').description('測試SpringBoot整合進行各種工作模式信息的發送')/*.termsOfServiceUrl('https://www.jianshu.com/p/c79f6a14f6c9')*/.contact('roykingw').version('1.0').build(); }}
6、ProducerController
@RestControllerpublic class ProducerController { @Autowired private RabbitTemplate rabbitTemplate; //helloWorld 直連模式 @ApiOperation(value = 'helloWorld發送接口', notes = '直接發送到隊列') @GetMapping(value = '/helloWorldSend') public Object helloWorldSend(String message) throws AmqpException, UnsupportedEncodingException {//設置部分請求參數MessageProperties messageProperties = new MessageProperties();messageProperties.setContentType(MessageProperties.CONTENT_TYPE_TEXT_PLAIN);//發消息rabbitTemplate.send('helloWorldqueue', new Message(message.getBytes('UTF-8'), messageProperties));return 'message sended : ' + message; } //工作隊列模式 @ApiOperation(value = 'workqueue發送接口', notes = '發送到所有監聽該隊列的消費') @GetMapping(value = '/workqueueSend') public Object workqueueSend(String message) throws AmqpException, UnsupportedEncodingException {MessageProperties messageProperties = new MessageProperties();messageProperties.setContentType(MessageProperties.CONTENT_TYPE_TEXT_PLAIN);//制造多個消息進行發送操作for (int i = 0; i < 10; i++) { rabbitTemplate.send('work_sb_mq_q', new Message(message.getBytes('UTF-8'), messageProperties));}return 'message sended : ' + message; } // pub/sub 發布訂閱模式 交換機類型 fanout @ApiOperation(value = 'fanout發送接口', notes = '發送到fanoutExchange。消息將往該exchange下的所有queue轉發') @GetMapping(value = '/fanoutSend') public Object fanoutSend(String message) throws AmqpException, UnsupportedEncodingException {MessageProperties messageProperties = new MessageProperties();messageProperties.setContentType(MessageProperties.CONTENT_TYPE_TEXT_PLAIN);//fanout模式只往exchange里發送消息。分發到exchange下的所有queuerabbitTemplate.send('fanoutExchange', '', new Message(message.getBytes('UTF-8'), messageProperties));return 'message sended : ' + message; } //routing路由工作模式 交換機類型 direct @ApiOperation(value = 'direct發送接口', notes = '發送到directExchange。exchange轉發消息時,會往routingKey匹配的queue發送') @GetMapping(value = '/directSend') public Object routingSend(String routingKey, String message) throws AmqpException, UnsupportedEncodingException {if (null == routingKey) { routingKey = 'china.changsha';}MessageProperties messageProperties = new MessageProperties();messageProperties.setContentType(MessageProperties.CONTENT_TYPE_TEXT_PLAIN);//fanout模式只往exchange里發送消息。分發到exchange下的所有queuerabbitTemplate.send('directExchange', routingKey, new Message(message.getBytes('UTF-8'), messageProperties));return 'message sended : routingKey >' + routingKey + ';message > ' + message; } //topic 工作模式 交換機類型 topic @ApiOperation(value = 'topic發送接口', notes = '發送到topicExchange。exchange轉發消息時,會往routingKey匹配的queue發送,*代表一個單詞,#代表0個或多個單詞。') @GetMapping(value = '/topicSend') public Object topicSend(String routingKey, String message) throws AmqpException, UnsupportedEncodingException {if (null == routingKey) { routingKey = 'changsha.kf';}MessageProperties messageProperties = new MessageProperties();messageProperties.setContentType(MessageProperties.CONTENT_TYPE_TEXT_PLAIN);//fanout模式只往exchange里發送消息。分發到exchange下的所有queuerabbitTemplate.send('topicExchange', routingKey, new Message(message.getBytes('UTF-8'), messageProperties));return 'message sended : routingKey >' + routingKey + ';message > ' + message; }}
7、ConcumerReceiver
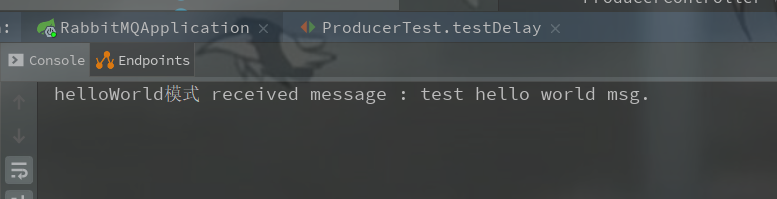
@Componentpublic class ConcumerReceiver { //直連模式的多個消費者,會分到其中一個消費者進行消費。類似task模式 //通過注入RabbitContainerFactory對象,來設置一些屬性,相當于task里的channel.basicQos @RabbitListener(queues = 'helloWorldqueue') public void helloWorldReceive(String message) {System.out.println('helloWorld模式 received message : ' + message); } //工作隊列模式 @RabbitListener(queues = 'work_sb_mq_q') public void wordQueueReceiveq1(String message) {System.out.println('工作隊列模式1 received message : ' + message); } @RabbitListener(queues = 'work_sb_mq_q') public void wordQueueReceiveq2(String message) {System.out.println('工作隊列模式2 received message : ' + message); } //pub/sub模式進行消息監聽 @RabbitListener(queues = 'fanout.q1') public void fanoutReceiveq1(String message) {System.out.println('發布訂閱模式1received message : ' + message); } @RabbitListener(queues = 'fanout.q2') public void fanoutReceiveq2(String message) {System.out.println('發布訂閱模式2 received message : ' + message); } //Routing路由模式 @RabbitListener(queues = 'direct_sb_mq_q1') public void routingReceiveq1(String message) {System.out.println('Routing路由模式routingReceiveq11111 received message : ' + message); } @RabbitListener(queues = 'direct_sb_mq_q2') public void routingReceiveq2(String message) {System.out.println('Routing路由模式routingReceiveq22222 received message : ' + message); } //topic 模式 //注意這個模式會有優先匹配原則。例如發送routingKey=hunan.IT,那匹配到hunan.*(hunan.IT,hunan.eco),之后就不會再去匹配*.ITd @RabbitListener(queues = 'topic_sb_mq_q1') public void topicReceiveq1(String message) {System.out.println('Topic模式 topic_sb_mq_q1 received message : ' + message); } @RabbitListener(queues = 'topic_sb_mq_q2') public void topicReceiveq2(String message) {System.out.println('Topic模式 topic_sb_mq_q2 received message : ' + message); }}二、簡單模式
隊列配置:
/** * HelloWorld rabbitmq第一個工作模式 * 直連模式只需要聲明隊列,所有消息都通過隊列轉發。 * 無需設置交換機 */@Configurationpublic class HelloWorldConfig {@Beanpublic Queue setQueue() {return new Queue('helloWorldqueue');}}三、工作隊列模式
@Configurationpublic class WorkConfig { //聲明隊列 @Bean public Queue workQ1() {return new Queue('work_sb_mq_q'); }}四、廣播模式(Fanout)
/** * Fanout模式需要聲明exchange,并綁定queue,由exchange負責轉發到queue上。 * 廣播模式 交換機類型設置為:fanout */@Configurationpublic class FanoutConfig {//聲明隊列@Beanpublic Queue fanoutQ1() {return new Queue('fanout.q1');}@Beanpublic Queue fanoutQ2() {return new Queue('fanout.q2');}//聲明exchange@Beanpublic FanoutExchange setFanoutExchange() {return new FanoutExchange('fanoutExchange');}//聲明Binding,exchange與queue的綁定關系@Beanpublic Binding bindQ1() {return BindingBuilder.bind(fanoutQ1()).to(setFanoutExchange());}@Beanpublic Binding bindQ2() {return BindingBuilder.bind(fanoutQ2()).to(setFanoutExchange());}}五、直連模式(Direct)
/* 路由模式|Routing模式 交換機類型:direct*/@Configurationpublic class DirectConfig {//聲明隊列@Beanpublic Queue directQ1() {return new Queue('direct_sb_mq_q1');}@Beanpublic Queue directQ2() {return new Queue('direct_sb_mq_q2');}//聲明exchange@Beanpublic DirectExchange setDirectExchange() {return new DirectExchange('directExchange');}//聲明binding,需要聲明一個routingKey@Beanpublic Binding bindDirectBind1() {return BindingBuilder.bind(directQ1()).to(setDirectExchange()).with('china.changsha');}@Beanpublic Binding bindDirectBind2() {return BindingBuilder.bind(directQ2()).to(setDirectExchange()).with('china.beijing');}}六、通配符模式(Topic)
/*Topics模式 交換機類型 topic* */@Configurationpublic class TopicConfig {//聲明隊列@Beanpublic Queue topicQ1() {return new Queue('topic_sb_mq_q1');}@Beanpublic Queue topicQ2() {return new Queue('topic_sb_mq_q2');}//聲明exchange@Beanpublic TopicExchange setTopicExchange() {return new TopicExchange('topicExchange');}//聲明binding,需要聲明一個roytingKey@Beanpublic Binding bindTopicHebei1() {return BindingBuilder.bind(topicQ1()).to(setTopicExchange()).with('changsha.*');}@Beanpublic Binding bindTopicHebei2() {return BindingBuilder.bind(topicQ2()).to(setTopicExchange()).with('#.beijing');}}
測試
我們啟動上面的SpringBoot項目。
然后我們訪問swagger地址:http://127.0.0.1:8080/swagger-ui.html
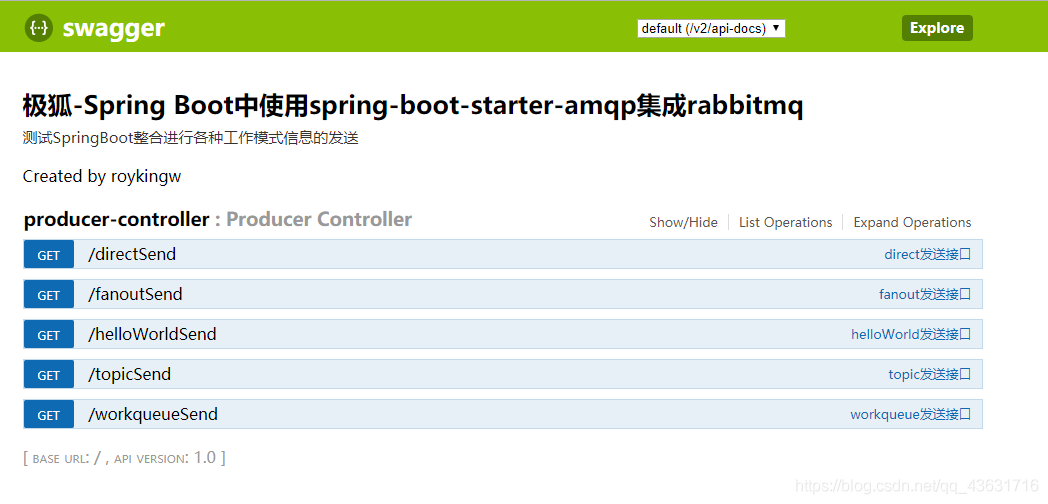
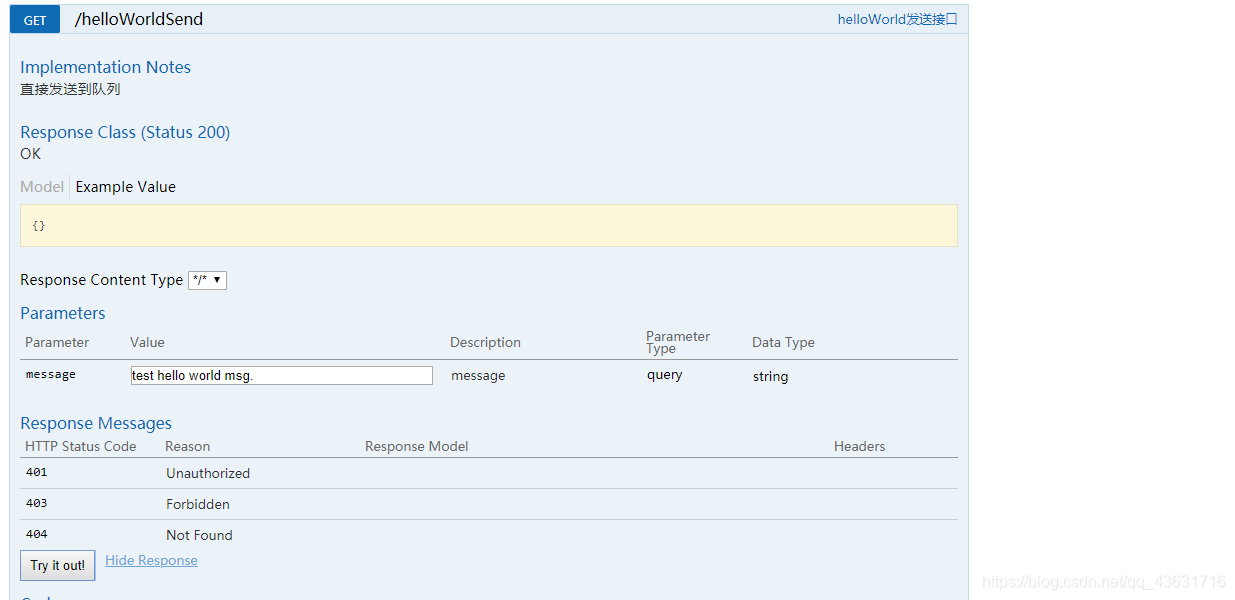
然后我們就可以使用swagger測試接口了。
或者可以使用postman進行測試。
到此這篇關于SpringBoot整合RabbitMQ的5種模式實戰的文章就介紹到這了,更多相關SpringBoot整合RabbitMQ模式內容請搜索好吧啦網以前的文章或繼續瀏覽下面的相關文章希望大家以后多多支持好吧啦網!
相關文章:

 網公網安備
網公網安備