vue-autoui自匹配webapi的UI控件的實現
vue-autoui 是一款基于vue和element擴展的一個自動化UI控件,它主要提供兩個控件封裝分別是auto-form和auto-grid; 通過這兩個控件可以完成大多數的信息輸入和查詢輸出的需要.auto-form和auto-grid是通過json來描述展示的結構,在處理上要比寫html標簽來得方便簡單, 但這控件的最大優勢并不是在這里,它最重要的功能是可以結合webapi的信息來自動輸出界面,只需要調整webapi的信息結構即可完成UI的調整。
基礎使用
控件可以直接在vuejs功能中使用,但需要結合json來設置具體UI展示,以下是一個簡單的例子
<auto-form ref='form' v-model='data' size='mini' :info='info'> </auto-form> <el-button @click='if($refs.form.success()){alert(JSON.stringify(data))}'>確定</el-button>
功能很簡單就是顯示當前輸入并驗證通過的數據,下面用json描述信息輸入源。
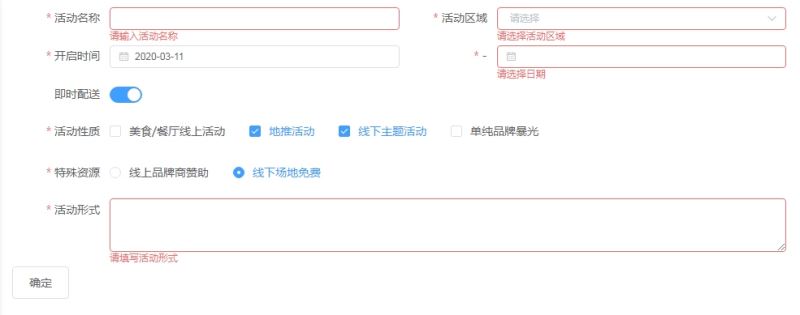
data(){ return {info: { items: [] },data: { }, }; }, mounted(){ var items = []; items.push({name: ’active’, label: ’活動名稱’, rules: [ { required: true, message: ’請輸入活動名稱’, trigger: ’blur’ }, { min: 3, max: 5, message: ’長度在 3 到 5 個字符’, trigger: ’blur’ }] }); items.push({name: ’region’, label: ’活動區域’, type: ’select’,data: [{ value: ’廣州’ }, { value: ’深圳’ }, { value: ’上海’ }, { value: ’北京’ }],rules: [{ required: true, message: ’請選擇活動區域’, trigger: ’change’ }],eof: true }); items.push({ name: ’starttime’, label: ’開啟時間’, type: ’date’, rules: [{ type: ’date’, required: true, message: ’請選擇日期’, trigger: ’change’ }] }); items.push({ name: ’endtime’, label: ’-’, type: ’date’, eof: true, rules: [{ type: ’date’, required: true, message: ’請選擇日期’, trigger: ’change’ }] }); items.push({ name: ’instant’, type: ’switch’, label: ’即時配送’, eof: true }); items.push({name: ’nature’, type: ’checkbox’, label: ’活動性質’,rules: [{ type: ’array’, required: true, message: ’請至少選擇一個活動性質’, trigger: ’change’ }],data: [{ value: ’美食/餐廳線上活動’ }, { value: ’地推活動’ }, { value: ’線下主題活動’ }, { value: ’單純品牌暴光’ }], eof: true }); items.push({name: ’resource’, label: ’特殊資源’, type: ’radio’, rules: [{ required: true, message: ’請選擇活動資源’, trigger: ’change’ }],data: [{ value: ’線上品牌商贊助’ }, { value: ’線下場地免費’ }], eof: true }); items.push({ name: ’remark’, label: ’活動形式’, type: ’remark’, rules: [{ required: true, message: ’請填寫活動形式’, trigger: ’blur’ }] }) this.info = { items: items} }
以上是使用json來描述一個輸出的界面,具體效果如下:
雖然用json來描述界面會比html描述會方便一些,但總體上來說工作量還是有些大的,在調整界面的時候也不方便。接下介紹一下如何結合BeetleX.FastHttpApi來進一步簡化這些繁瑣的操作。
Webapi動態輸出
其實在構建vue-autoui的時候更多是考慮和BeetleX.FastHttpApi進行一個整合,通過和后端融合可以把這些UI編寫的工作量大大節省下來,讓開發這些功能變得更簡單方便,更重要的是api變化后界面就自動適應。使用要求:在和BeetleX.FastHttpApi整合還需要引用BeetleX.FastHttpApi.ApiDoc插件,因為這個插件用于給接口輸出對應UI的JSON信息。接下來通過幾個示例來介紹整合的方便性:
登陸
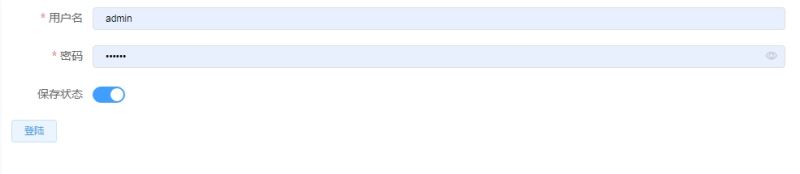
登陸功能是比較常見的,接下來看一下使用auto-form如何結合webapi來完成這個功能。
<div> <auto-form ref='login' url='/login' v-model='login.data' size='mini'> </auto-form> <el-button size='mini' @click='if($refs.login.success())login.post()'> 登陸 </el-button></div>
以上是一個登陸功能UI的定義,是不是很簡單呢?通過指定url的webapi連接即可以自動適應UI;這時候只需要針對登陸接口進行一個定義即可:
[Input(Label = '用戶名', Name = 'name', Eof = true)] [Required('用戶名不能為空', Name = 'name')] [Input(Label = '密碼', Name = 'pwd', Type = 'password', Eof = true)] [Required('用戶密碼不能為空', Name = 'pwd')] [Input(Label = '保存狀態', Value = true, Name = 'saveStatus')] public bool Login(string name, string pwd, bool saveStatus) { Console.WriteLine($'name:{name} pwd:{pwd} saveStatus:{saveStatus}'); return name == 'admin'; }
注冊
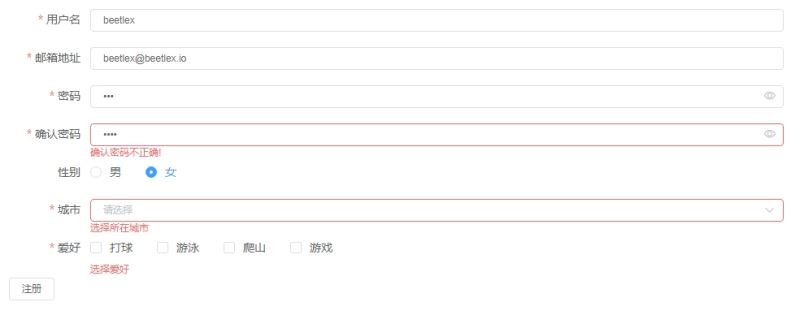
接下來定義一個信息多些的注冊界面
<div> <auto-form ref='login' url='/register' v-model='register.data' size='mini' @completed='onCompleted'> </auto-form> <el-button size='mini' @click='if($refs.login.success())register.post()'> 注冊 </el-button></div>
在UI定義上基于沒什么變化,只是調整一下對應的url地址,在這里多了一下completed事件,這個事件主要是通過接口加載UI信息才會觸發的。對應功能的javascript代碼
data(){ return {register: new beetlexAction(’/register’, {}),checkConfirmPassword: (rule, value, callback) => { var password = this.$refs.login.getField(’Password’); var cpassword = this.$refs.login.getField(’ConfirmPassword’); if (password.value != cpassword.value) callback(new Error(’確認密碼不正確!’)); else callback();}, } }, methods: { onCompleted(){this.$refs.login.getField(’ConfirmPassword’).rules.push({ validator: this.checkConfirmPassword, trigger: ’blur’ }); }, }, mounted() { this.register.requested = (r) => {alert(JSON.stringify(r)); }; }
代碼主要是定密碼和確認密碼的對比驗證,接下來看一下后臺注冊對應的接口
[Post] public RegisterDto Register(RegisterDto register) { Console.WriteLine(Newtonsoft.Json.JsonConvert.SerializeObject(register)); return register; } public class RegisterDto { [Input(Label = '用戶名', Eof = true)] [Required('用戶名不能為空')] [DataRange('用戶名的必須大于3個字符', Min = 3)] public string Name { get; set; } [Input(Label = '郵箱地址', Eof = true)] [Required('郵件地址無效', Type = 'email')] public string Email { get; set; } [Input(Label = '密碼', Eof = true, Type = 'password')] [Required('輸入密碼')] public string Password { get; set; } [Input(Label = '確認密碼', Eof = true, Type = 'password')] [Required('輸入確認密碼')] public string ConfirmPassword { get; set; } [GenderInput(Label = '性別', Value = '男', Eof = true)] public string Gender { get; set; } [Required('選擇所在城市')] [CityInput(Label = '城市', Eof = true)] public string City { get; set; } [HobbyInput(Label = '愛好')] [Required('選擇愛好', Type = 'array', Trigger = 'change')] public string[] Hobby { get; set; } }
服務代碼也沒太多的變化,只是通過一些標簽來標記一下相關屬性的數據源和輸入要求.具體運行效果如下:
數據列表
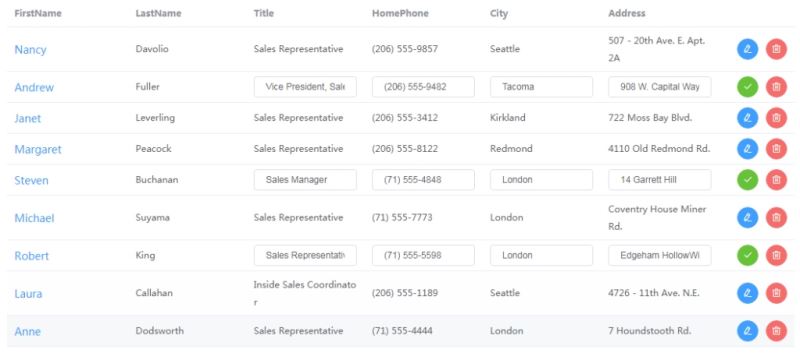
有應用中除了數據輸出外更多的數據列表,auto-grid即是專門用于處理列表的一個控件,這個控件提供分頁,選擇,編輯和刪除的功能;接下來做一個簡單的雇員列表示例:
<auto-grid url='/employees' @completed='employees.get()' @itemchange='onItemChange' @itemdelete='onItemDelete' @command='onCommand' :data='employees.result' size='mini' edit='true' delete='true'></auto-grid>
這個列表提供編輯和刪除功能,相關腳本代碼如下:
data(){ return {employees: new beetlexAction(’/employees’, {}, []) } }, methods: { onCommand(e){this.$open(’models-employee’, e.data); }, onItemChange(item){if (confirm(’是否要修改’ + item.data.FirstName + ’?’)) { item.success();} }, onItemDelete(item){if (confirm(’是否要刪除’ + item.data.FirstName + ’?’)) { item.success();} }, }, mounted() { }
接下來的工作就是在服務端定義api來輸出結果
[Column('FirstName', Type = 'link')] [Column('LastName', Read = true)] [Column('Title')] [Column('HomePhone')] [Column('City')] [Column('Address')] public object Employees() { return DataHelper.Defalut.Employees; }
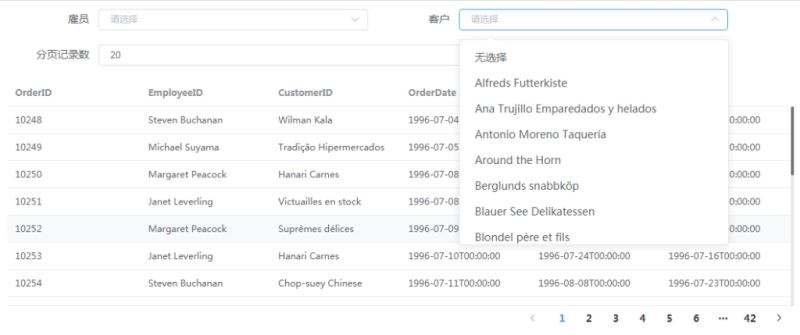
動態查詢
實際應用中需要提供查詢條件輸入,這個時候就可以把auto-form和auto-grid整合起來,以下通過一個簡單的訂單查詢來展示這兩個控件結合使用
<auto-form url='/orders' v-model='orders.data' @completed='orders.get()' size='mini' @fieldchange='orders.get()'> </auto-form> <auto-grid url='/orders' :data='orders.result.items' :pages='orders.result.pages' :currentpage='orders.result.index' @pagechange='onPageChange' size='mini'> </auto-grid>
可以在auto-form的fieldchange事件中自動執行查詢,對應的腳本代碼如下:
data(){ return {orders: new beetlexAction('/orders', {}, { index: 0, pages: 0, items: [] }) }; }, methods: { onPageChange(page){this.orders.data.index = page;this.orders.get(); }, }, mounted(){ }
接下來需要實現服務端代碼,由于方法需要描述輸入和列表所以對應的標簽比較多
data(){ return {orders: new beetlexAction('/orders', {}, { index: 0, pages: 0, items: [] }) }; }, methods: { onPageChange(page){this.orders.data.index = page;this.orders.get(); }, }, mounted(){ }
插件詳細代碼https://github.com/IKende/BeetleX-Samples/tree/master/Web.AutoUI
https://github.com/IKende/vue-autoui
到此這篇關于vue-autoui自匹配webapi的UI控件的實現的文章就介紹到這了,更多相關vue-autoui自匹配webapi的UI控件內容請搜索好吧啦網以前的文章或繼續瀏覽下面的相關文章希望大家以后多多支持好吧啦網!
相關文章:

 網公網安備
網公網安備