VUE : vue-cli中去掉路由中的井號#操作
vue-cli項目中,如果想去掉url地址欄中的“#”我們可以用路由的 history 模式,這種模式充分利用 history.pushState API 來完成 URL 跳轉而無須重新加載頁面。
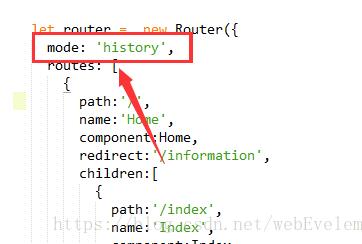
只需要在路由表中,加入一行代碼即可。
補充知識:vue 打包部署去掉#注意事項
示例基于vue cli2.0腳手架生成的項目
1.vue項目中config文件下index.js中打包配置:
build: { // Template for index.html index: path.resolve(__dirname, ’../dist/index.html’), // Paths assetsRoot: path.resolve(__dirname, ’../dist’), assetsSubDirectory: ’static’, assetsPublicPath: ’/dist/’, // 這個地方使用絕對路徑 很重要! /** * Source Maps */ productionSourceMap: true, // https://webpack.js.org/configuration/devtool/#production devtool: ’#source-map’, // Gzip off by default as many popular static hosts such as // Surge or Netlify already gzip all static assets for you. // Before setting to `true`, make sure to: // npm install --save-dev compression-webpack-plugin productionGzip: false, productionGzipExtensions: [’js’, ’css’], // Run the build command with an extra argument to // View the bundle analyzer report after build finishes: // `npm run build --report` // Set to `true` or `false` to always turn it on or off bundleAnalyzerReport: process.env.npm_config_report}
2.路由配置:router文件夾下index.js:
export default new Router({ mode: ’history’, // 去掉#,需要路由模式改為history base: ’/dist/’, // 這個配置也很重要,否則會出現頁面空白情況 scrollBehavior: () => ({ y: 0 }), routes: [ { path: ’/facebook’, name: ’Facebook’, component: Facebook }, { path: ’/google’, name: ’Google’, component: Google } ]})
3.剩下的不懂 就要找你得運維或者后端開發小伙伴了,nginx配置:
server { listen 8080; server_name localhost; #charset koi8-r; #access_log logs/host.access.log main; #打包后的項目目錄,一定記住這個地方帶有項目名稱 root /Users/qiilee/Desktop/vue/dist; index index.html; location /dist {#這個地方沒有項目名稱,因為請求的時候如果請求:http://localhost:8080/dist ,nginx會查找/Users/qiilee/Desktop/vue/dist/目錄下的數據root /Users/qiilee/Desktop/vue;try_files $uri $uri/ @router;index index.html; } //try_files $uri $uri/ @router;和下邊部分很重要,沒有這部分發布二級一下的路由會出現js加載,但是也沒空白的情況 location @router {rewrite ^.*$ /index.html last; } }
以上這篇VUE : vue-cli中去掉路由中的井號#操作就是小編分享給大家的全部內容了,希望能給大家一個參考,也希望大家多多支持好吧啦網。
相關文章:

 網公網安備
網公網安備