詳解用 python-docx 創建浮動圖片
相信大家對python-docx這個常用的操作docx文檔的庫都不陌生,它支持以內聯形狀(Inline Shape)的形式插入圖片,即圖片和文本之間沒有重疊,遵循流動版式(flow layout)。但是,截至最新的0.8.10版本,python-docx尚不支持插入浮動圖片(floating picture)。這顯然不能滿足豐富多彩的文檔樣式的需要,因此本文探究基于python-docx插入浮動圖片——剖析xml、追蹤源碼,最后得到完整代碼。
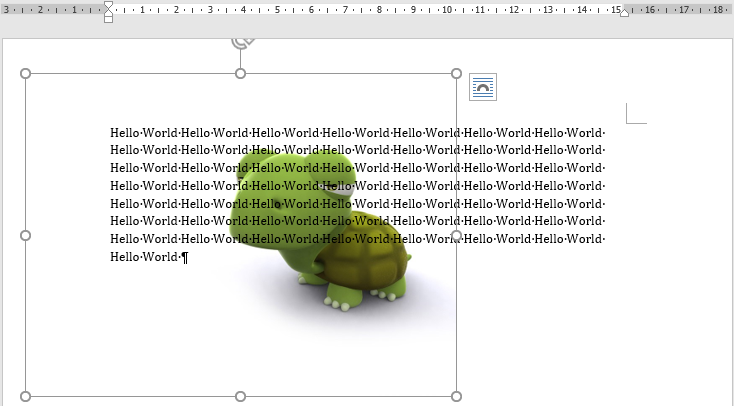
問題提出作者在嘗試實現PDF文檔轉docx(pdf2docx:https://github.com/dothinking/pdf2docx,開發中)的過程中遇到一個需求:根據背景圖片在PDF頁面的具體位置(例如左上角坐標和圖片區域的長寬),將其重現到docx頁面的相應位置。考慮到背景圖片與文本的重疊,這就需要實現精確定位的浮動圖片,參考下圖示例。

我們先嘗試在Office Word中,手動解決上述問題。具備基礎的Word使用經驗即可知,通過設置圖片版式來控制圖片的浮動和具體位置。
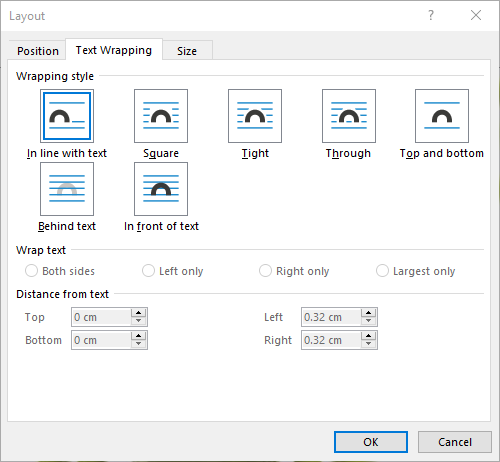
上圖版式設置中的文本環繞樣式,大體可以分為三類:
分類 文本重疊 自由定位 樣式名稱 嵌入型 否 否 In line with text 環繞型 否 是 Square, Tight, Through, Top and bottom 完全浮動 是 是 behind text, In front of text
例如最常見的嵌入型圖片,它占據了整行區域,我們既不能將其與文字重疊,也不能自由放置它的位置,而是由頁面排版自動確定。對于環繞型圖片,文本可以進入圖片所在行,但是無法與之重疊;并且,我們可以用鼠標自由拖動其位置。完全浮動型圖片則可以浮于文本上方或者襯于文本下方,同時支持隨意放置其位置。
如果需要精確定位,則可在圖片版式的位置(Position)選項卡進行設置。它提供了多種定位方式,例如絕對定位——根據圖片左上角點距離水平和豎直參考的坐標值來定位。至于參考對象,可以是頁面(Page)本身,這樣(0, 0)就是頁面左上角;也可以是邊距(Margin),此時(0, 0)即為正文區域的左上角。
綜上,我們需要實現精確定位的襯于文本下方的圖片版式。
docx背后的xml我們還知道,docx文檔的背后是xml格式的數據,python-docx正是通過處理xml的方式來讀寫word文檔。所以,接下來先手工創建word文檔,然后查看圖片部分的xml內容。
作為對比,首先分別創建一個普通嵌入型圖片文件和一個襯于文本下方的浮動型圖片文件。然后執行查看步驟:右鍵docx文件 | 7-zip打開壓縮包 | word | document.xml,復制文件內容并格式化xml,得到如下的關于圖片部分的片段。為了便于對比分析,刪除了一些節點屬性。
內聯圖片片段:
<w:drawing> <wp:inline><wp:extent cx='3297600' cy='2782800'/><wp:effectExtent l='0' t='0' r='0' b='0'/><wp:docPr id='1' name='Picture 1'/><wp:cNvGraphicFramePr> <a:graphicFrameLocks/></wp:cNvGraphicFramePr><a:graphic> <a:graphicData><pic:pic> <!-- more pic content --></pic:pic> </a:graphicData></a:graphic> </wp:inline></w:drawing>
浮動圖片片段:
<w:drawing> <wp:anchor behindDoc='1' locked='0' layoutInCell='1' allowOverlap='1'><wp:simplePos x='0' y='0'/><wp:positionH relativeFrom='page'> <wp:posOffset>285750</wp:posOffset></wp:positionH><wp:positionV relativeFrom='page'> <wp:posOffset>457200</wp:posOffset></wp:positionV><wp:extent cx='3297600' cy='2782800'/><wp:effectExtent l='0' t='0' r='0' b='0'/><wp:wrapNone/><wp:docPr id='1' name='Picture 1'/><wp:cNvGraphicFramePr> <a:graphicFrameLocks/></wp:cNvGraphicFramePr><a:graphic> <a:graphicData><pic:pic> <!-- more pic content --></pic:pic> </a:graphicData></a:graphic> </wp:anchor></w:drawing>
對比發現以下相同/相似點:
兩類圖片都放在<w:drawing>節點下:內聯圖片<wp:inline>,浮動圖片<wp:anchor> 具備相同的內容節點:<wp:extent>、<wp:docPr>、<a:graphic>等除此之外,浮動圖片還有一些獨有特征,并且我們可以從命名上猜測和解讀:
<wp:anchor>節點的behindDoc屬性表明圖片版式為襯于文本下方
<wp:positionH>和<wp:positionV>節點表明水平和豎直絕對定位方式,其中:
relativeFrom屬性指定用于定位的參考對象 子節點<wp:posOffset>指定具體坐標值從內聯圖片開始從xml的結構對比來看,我們完全可以根據python-docx對內聯圖片的實現來插入浮動圖片。于是,從插入內聯圖片的代碼入手:
from docx import Documentfrom docx.shared import Pt document = Document()document.add_picture(’image.jpg’, width=Pt(200))document.save(’output.docx’)
從python-docx安裝文件夾site-packages/docx進行內容搜索add_picture,得到docx.text.run.add_picture原始定義處:
def add_picture(self, image_path_or_stream, width=None, height=None): inline = self.part.new_pic_inline(image_path_or_stream, width, height) self._r.add_drawing(inline) return InlineShape(inline)
繼續搜索new_pic_inline得到docx.parts.story.BaseStoryPart.new_pic_inline。從注釋可知這是利用CT_Inline類創建<wp:inline>元素,因此后續創建浮動圖片的<wp:anchor>可以在此基礎上修改。
def new_pic_inline(self, image_descriptor, width, height): '''Return a newly-created `w:inline` element. The element contains the image specified by *image_descriptor* and is scaled based on the values of *width* and *height*. ''' rId, image = self.get_or_add_image(image_descriptor) cx, cy = image.scaled_dimensions(width, height) shape_id, filename = self.next_id, image.filename return CT_Inline.new_pic_inline(shape_id, rId, filename, cx, cy)
于是進入CT_Inline類(限于篇幅,刪除了前兩個類方法new和new_pic_inline的具體代碼)——終于見到了一開始探索的xml代碼:
class CT_Inline(BaseOxmlElement): ''' ``<w:inline>`` element, container for an inline shape. ''' @classmethod def new(cls, cx, cy, shape_id, pic):pass @classmethod def new_pic_inline(cls, shape_id, rId, filename, cx, cy):pass @classmethod def _inline_xml(cls):return ( ’<wp:inline %s>n’ ’ <wp:extent cx='914400' cy='914400'/>n’ ’ <wp:docPr id='666' name='unnamed'/>n’ ’ <wp:cNvGraphicFramePr>n’ ’ <a:graphicFrameLocks noChangeAspect='1'/>n’ ’ </wp:cNvGraphicFramePr>n’ ’ <a:graphic>n’ ’ <a:graphicData uri='URI not set'/>n’ ’ </a:graphic>n’ ’</wp:inline>’ % nsdecls(’wp’, ’a’, ’pic’, ’r’))
簡單掃一下CT_Inline類的三個方法,即可將它們聯系上:
_inline_xml()方法給出內聯圖片<wp:inline>的xml結構。 new()方法調用_inline_xml(),并為其中的子節點例如<wp:extent>和<wp:docPr>賦值。 new_pic_inline()調用new(),同時拼接CT_Picture類的結果(節點<pic:pic>,即圖片的具體內容)到<a:graphicData>節點中去。綜上,實現了內聯圖片的完整xml結構。
插入浮動圖片從xml結構的對比及上述python-docx對內聯圖片的實現,得到創建浮動圖片的思路:
初始化<wp:anchor>結構,例如behindDoc='1'指定圖片版式為襯于文本下方 使用類似的代碼填充<wp:anchor>元素,尤其是<wp:extent>、<wp:docPr>和<pic:pic> 填充<wp:positionH>和<wp:positionV>精確定位圖片具體實踐中發現還有關鍵的一步——注冊xml標簽名稱到對應的類,例如<wp:inline>和CT_Inline:
# docx.oxml.__init__.pyregister_element_cls(’wp:inline’, CT_Inline)
綜上,利用python-docx插入浮動圖片(襯于文本下方、頁面定位)的完整代碼如下:
# -*- coding: utf-8 -*- # filename: add_float_picture.py ’’’Implement floating image based on python-docx.- Text wrapping style: BEHIND TEXT <wp:anchor behindDoc='1'>- Picture position: top-left corner of PAGE `<wp:positionH relativeFrom='page'>`.Create a docx sample (Layout | Positions | More Layout Options) and explore the source xml (Open as a zip | word | document.xml) to implement other text wrappingstyles and position modes per `CT_Anchor._anchor_xml()`.’’’ from docx.oxml import parse_xml, register_element_clsfrom docx.oxml.ns import nsdeclsfrom docx.oxml.shape import CT_Picturefrom docx.oxml.xmlchemy import BaseOxmlElement, OneAndOnlyOne # refer to docx.oxml.shape.CT_Inlineclass CT_Anchor(BaseOxmlElement): ''' ``<w:anchor>`` element, container for a floating image. ''' extent = OneAndOnlyOne(’wp:extent’) docPr = OneAndOnlyOne(’wp:docPr’) graphic = OneAndOnlyOne(’a:graphic’) @classmethod def new(cls, cx, cy, shape_id, pic, pos_x, pos_y):'''Return a new ``<wp:anchor>`` element populated with the values passedas parameters.'''anchor = parse_xml(cls._anchor_xml(pos_x, pos_y))anchor.extent.cx = cxanchor.extent.cy = cyanchor.docPr.id = shape_idanchor.docPr.name = ’Picture %d’ % shape_idanchor.graphic.graphicData.uri = ( ’http://schemas.openxmlformats.org/drawingml/2006/picture’)anchor.graphic.graphicData._insert_pic(pic)return anchor @classmethod def new_pic_anchor(cls, shape_id, rId, filename, cx, cy, pos_x, pos_y):'''Return a new `wp:anchor` element containing the `pic:pic` elementspecified by the argument values.'''pic_id = 0 # Word doesn’t seem to use this, but does not omit itpic = CT_Picture.new(pic_id, filename, rId, cx, cy)anchor = cls.new(cx, cy, shape_id, pic, pos_x, pos_y)anchor.graphic.graphicData._insert_pic(pic)return anchor @classmethod def _anchor_xml(cls, pos_x, pos_y):return ( ’<wp:anchor distT='0' distB='0' distL='0' distR='0' simplePos='0' relativeHeight='0' n’ ’ behindDoc='1' locked='0' layoutInCell='1' allowOverlap='1' n’ ’ %s>n’ ’ <wp:simplePos x='0' y='0'/>n’ ’ <wp:positionH relativeFrom='page'>n’ ’ <wp:posOffset>%d</wp:posOffset>n’ ’ </wp:positionH>n’ ’ <wp:positionV relativeFrom='page'>n’ ’ <wp:posOffset>%d</wp:posOffset>n’ ’ </wp:positionV>n’’ <wp:extent cx='914400' cy='914400'/>n’ ’ <wp:wrapNone/>n’ ’ <wp:docPr id='666' name='unnamed'/>n’ ’ <wp:cNvGraphicFramePr>n’ ’ <a:graphicFrameLocks noChangeAspect='1'/>n’ ’ </wp:cNvGraphicFramePr>n’ ’ <a:graphic>n’ ’ <a:graphicData uri='URI not set'/>n’ ’ </a:graphic>n’ ’</wp:anchor>’ % ( nsdecls(’wp’, ’a’, ’pic’, ’r’), int(pos_x), int(pos_y) ))# refer to docx.parts.story.BaseStoryPart.new_pic_inlinedef new_pic_anchor(part, image_descriptor, width, height, pos_x, pos_y): '''Return a newly-created `w:anchor` element. The element contains the image specified by *image_descriptor* and is scaled based on the values of *width* and *height*. ''' rId, image = part.get_or_add_image(image_descriptor) cx, cy = image.scaled_dimensions(width, height) shape_id, filename = part.next_id, image.filenamereturn CT_Anchor.new_pic_anchor(shape_id, rId, filename, cx, cy, pos_x, pos_y)# refer to docx.text.run.add_picturedef add_float_picture(p, image_path_or_stream, width=None, height=None, pos_x=0, pos_y=0): '''Add float picture at fixed position `pos_x` and `pos_y` to the top-left point of page. ''' run = p.add_run() anchor = new_pic_anchor(run.part, image_path_or_stream, width, height, pos_x, pos_y) run._r.add_drawing(anchor)# refer to docx.oxml.__init__.pyregister_element_cls(’wp:anchor’, CT_Anchor)示例
最后,來一個例子看看結果吧:
from docx import Documentfrom docx.shared import Inches, Ptfrom add_float_picture import add_float_picture if __name__ == ’__main__’: document = Document() # add a floating picture p = document.add_paragraph() add_float_picture(p, ’test.png’, width=Inches(5.0), pos_x=Pt(20), pos_y=Pt(30)) # add text p.add_run(’Hello World ’*50) document.save(’output.docx’)
作者:crazyhat,Python及科學計算愛好者
到此這篇關于詳解用 python-docx 創建浮動圖片的文章就介紹到這了,更多相關python-docx 浮動圖片內容請搜索好吧啦網以前的文章或繼續瀏覽下面的相關文章希望大家以后多多支持好吧啦網!
相關文章:
1. vue-drag-chart 拖動/縮放圖表組件的實例代碼2. vue使用moment如何將時間戳轉為標準日期時間格式3. Android studio 解決logcat無過濾工具欄的操作4. 什么是Python變量作用域5. js select支持手動輸入功能實現代碼6. PHP正則表達式函數preg_replace用法實例分析7. Android Studio3.6.+ 插件搜索不到終極解決方案(圖文詳解)8. bootstrap select2 動態從后臺Ajax動態獲取數據的代碼9. Android 實現徹底退出自己APP 并殺掉所有相關的進程10. 一個 2 年 Android 開發者的 18 條忠告

 網公網安備
網公網安備